Showven cFlamer Flame Machine
In stock


Description / Showven cFlamer Flame Machine
Showven cFlamer Flame Machine
The Showven cFlamer is a high-performance vertical flame projector designed to create vibrant, colorful flame effects safely and reliably. Supporting five flame colors (red, green, blue, yellow, and purple) using Showven’s original color fluid additives, the cFlamer delivers stunning visuals without pyrotechnics or open-flame risks.
Its corrosion-resistant internal pump and pipe system, lightweight body, and DMX/pyro signal control make it ideal for touring, stage shows, concerts, and both indoor and outdoor events. The cFlamer is the perfect solution when you need real flame visuals without the complexity of traditional flame systems.
Ignite your performances with the Showven cFlamer, a powerful 400W fluid-based color flame machine that delivers vibrant, vertical flame effects up to 32.80 feet (10 meters) high. Perfect for concerts, theatrical productions, festivals, and large-scale events, this unit produces stunning flames in red, green, blue, yellow, and purple using Showven’s FX color additives (sold separately) alongside ISOPAR or ISOPROPANOL fluids. Its compact, IP55-rated aluminum and 304 stainless steel housing ensures durability and water resistance, making it ideal for both indoor and outdoor use, even in rainy conditions. With a 5.3-liter fuel tank, the cFlamer offers extended operation for continuous, high-impact flame displays.
Designed for reliability and safety, the cFlamer features dual high-voltage electron ignitions and dual valves for efficient flame production, paired with a fuel filtration system to prevent blockages. DMX control with 9-60V signal compatibility allows seamless integration into professional setups, while an E-stop and ARM indicator light enhance operational safety. The water- and corrosion-resistant pump and pipe system ensures consistent performance in any environment. Complete with a PowerCON TRUE1 cable, the cFlamer is the ultimate tool for creating vibrant, safe, and mesmerizing flame effects that captivate audiences.
Features and Advantages:
-
Shoots vertical flame effects up to 33 feet high
-
Uses ISOPAR, ISOPROPANOL, and Showven color fluid additives
-
Produces vivid flame colors: Red, Green, Blue, Yellow, Purple
-
Internal corrosion-resistant pump system
-
Controlled via DMX or 9–60V pyro signal
-
Lightweight and portable for fast setups
-
Durable aluminum + 304 stainless steel housing
-
Built for indoor and outdoor use
Features
- Maximum flame height of 32.80 feet (10 meters) for dramatic, high-impact vertical flame effects.
- Vibrant colored flames in red, green, blue, yellow, and purple with optional Showven FX color additives.
- IP55-rated aluminum and 304 stainless steel housing for durable, water-resistant performance in various weather conditions.
- 5.3-liter fuel tank for extended operation with fewer refills.
- Compatible with ISOPAR and ISOPROPANOL fluids for standard and vibrant flame effects.
- Dual high-voltage electron ignition systems for fast, reliable flame production.
- Fuel filtration system and dual valves for optimal performance and precise flame control.
- DMX control with 9-60V signal compatibility for seamless integration into professional setups.
- Water- and corrosion-resistant pump and pipe system for reliable, consistent performance.
- E-stop and ARM indicator light for enhanced safety during operation.
- Compact design for easy setup and portability in various event settings.
- Includes 9.84FT PowerCON TRUE1 cable for quick, professional connections.
- Perfect for concerts, theatrical performances, festivals, and large-scale events requiring dynamic flame effects.
Specifications
General
- Dimensions: 14.56 x 12.99 x 12 inches
- Net Weight: 44 lbs
- Voltage: AC100-120V, 50/60Hz
- Power Rating: 400W
- Housing Material: Aluminum and 304 Stainless Steel
- Consumable: Isopar L, Isopropanol
- Color Additives Optional: FX-Red, FX-Green, FX-Blue, FX-Yellow, FX-Purple
- Fuel Tank Capacity: 5.3-Liter
- Maximum Flame Height: 32.80ft
- Effect Direction: Vertical (Up)
- Nozzle Type: Nozzle cH
- Power Connections: Neutrik PowerCON TRUE1
- Data Connections: IP65-rated 3-Pin and 5-Pin XLR in/out
- Control: DMX, 9-60V signal
- E-Stop: Yes
- ARM Indicator Light: Yes
- Fuel Filtration: Yes
- Ignition: High voltage electron ignition x 2
- Valve: Dual
- Use in Rain: Yes
What’s Included
- (1) cFlamer
- (1) 9.84FT PowerCON TRUE1 Male to Edison Male Power Cable
Physical
- Shipping Dimensions: 20 x 16 x 17 inches
- Shipping Weight: 80 lbs
Specifications:
| Specification | Details |
|---|---|
| Model | cFlamer |
| Dimensions | 14.6 in (L) × 13.0 in (W) × 12.0 in (H) |
| Shipping Weight | 80 lb |
| Power Supply | AC 100–120V / 200–240V, 50/60 Hz, 400W |
| Housing Material | Aluminum + 304 Stainless Steel |
| Effect Direction | Vertical |
| Max Flame Height | Up to 33 ft |
| Fuel Types | ISOPAR, ISOPROPANOL, Color Fluids |
| Flame Colors | Red, Green, Blue, Yellow, Purple |
| Control | DMX, 9–60V Pyro Signal |
| Ignition System | High-Voltage Electronic Ignition |
| Recommended Use | Stage shows, concerts, festivals, corporate events |
SHOWVEN Technologies Co., Ltd.
Thanks for choosing SHOWVEN cFlamer, we wish it will bring you lots of exciting moments.
Please read the following user’s manual and related product installation guide carefully before
operating this device.
Δ Safety Instructions
1. Safety icons explanation
Safety instructions warn of hazards when handling equipment and provide information on how to avoid
those hazards. They are classified according to the severity of the hazard and are divided into the
following groups. Please do follow all safety instructions in this document!
DANGER: Indicates a hazardous situation that, if not avoided, will result in death or serious injury.
(This signal word is limited to the most extreme situations)
WARNING: Indicates a hazardous situation that, if not avoided, could result in serious injury.
CAUTION: Indicates a hazardous situation that, if not avoided, could result in minor or moderate
injury.
NOTICE: Provide additional or supplementary information.
2. General Safety Instructions.
\ Unauthorized repair are prohibited, it may cause serious incident.
\ Make sure power supply in consistent with the rated voltage of the equipment, and the socket must
well grounded. Unplug and turn off the machine when not use.
\ Please connect DMX cable before power on cFlamer, and ensure that the communication command is
disarmed, and the safety switch of device is under test mode.
\ After turning on the device, no person allows to stay in the safety isolation zone. Ensure all persons
that are part of the show be informed about the safety distance, risks and functions of the device.
\ Always have a CO2 fire extinguisher and an extinguishing blanket in case of needed.
\ If there be any doubt as to the safety operation of the device in any circumstances, the device should
be taken out of service immediately. Be sure the device is in good operating condition before use. If fail
to fire correctly, immediately shut down and check it accordingly. Any questions please always contact
SHOWVEN ([email protected]) for help.
\ Be sure to use high quality fuels, otherwise, it is easily leads to failure or danger. Please keep fuels away
from heat source, sparks, fire or other possibility of ignition. Do not smoke!
\ The operator responsible for the control of flame system must always have a clear view of the device,
so that he/she can stop the show immediately when there is danger. The main AC power switch should
near operator. So that operator can turn off the power of all devices in case of abnormal.
\ Please connect device with SHOWVEN E-STOPPER so that operator can stop the device immediately if
there is any emergency case.
\ The device shall not be altered and applied to other use purpose.
3. Disclaimers:
SHOWVEN technologies Co., Ltd excludes liability for unsafe situations, accidents and damages resulting
from:
1. Ignoring warnings or regulations as shown on product manual or this manual.
2. Use for other applications or circumstances other than those indicated herein.
3. Changes to the device, including use of non-original spare parts, lack of maintenance etc.
4. Dismantling device without authorization from SHOWVEN.
5. Use this machine by unqualified or untrained personnel.
6. Improper use of machine
Warning
A dry powder fire extinguisher, a carbon dioxide fire extinguisher and a fire blanket must be equipped
next to the equipment. Someone must be on duty during operation. In case of fire accident, dry powder
fire extinguisher can be used when the fire is large, and a carbon dioxide fire extinguisher can be used
when the fire is small.
Δ Technical Specifications
\ Model: cFlamer
\ Housing Material: Stainless steel + Aluminum
\ Dimension: 370 330 305mm
\ Weight: 20kg
\ Input: AC100-120V / AC 200-240V, 50/60Hz
\ Work Power: 400W
\ Ignition: Dual igniters, high voltage electron ignition
\ Dual Vlave: Yes
\ Control: DMX , 9-60V pyro signal, Wireless with Wireless DMX Receiver (5-PIN DMX IN with DC5V
power supply)
\ DMX: 3-pin and 5-pin DMX IN / OUT
\ E-Stop Interface: Yes, can be connected in series
\ Effect Direction: Vertical
\ Flame Height: 8-10m (no wind, cH nozzle, SHOWVEN color fluid );
5-6m (no wind, cL nozzle,SHOWVEN color fluid );
\ Tank Capacity: 5.3L
\ Fuel: SHOWVEN color fluid, ISOPAR L, ISOPROPANOL
\ Color Optional: Red, Gren, Blue, Yellow, Purple (only compatible with SHOWVEN original color fluid)
\ Fuel Tube Filter: Yes
\ Tip sensor: Yes
\ Usage in Rain: Yes
\ ARM light: Yes
Δ Structure
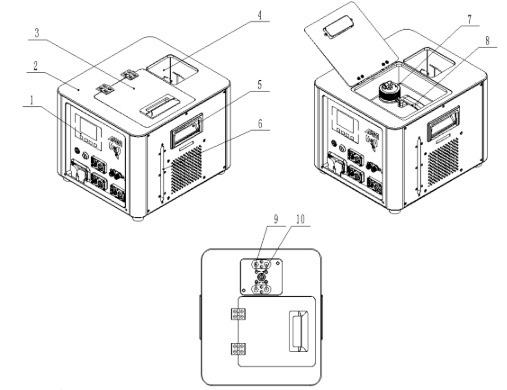
1. Rear panel
2. Top panel
3. Fuel tank cover
4. Fire box
5. Handle
6. Liquid level window
7. Fuel tank cap
8. Fuel tank
9. Igniter
10. Nozzle
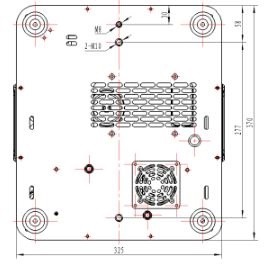
Diagram of bottom panel
Δ Rear Panel
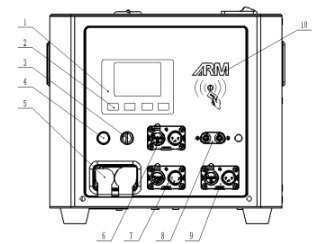
1. LCD screen
2. Touch button
3. Safety switch
4. Power Switch (with Power indicator light)
5. Power IN / OUT
6. 3-pin XLR IN/OUT
7. 5-pin XLR IN/OUT (5-PIN XLR IN can charge for wireless DMX pen through pin1 and 4, pin4 with
DC5V power supply)
8. 9-60V pyro signal port
9. E-stop interface
10. ARM indicator light
Δ Display and setting
1. Welcome interface
2. Main interface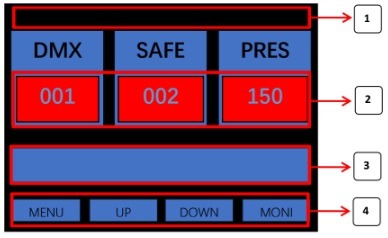
1.) Status Bar
![]() : appears when “External Trigger” is “ON”
: appears when “External Trigger” is “ON”![]() : appears when “safety switch” stay at “USER MODE”
: appears when “safety switch” stay at “USER MODE”
2N/2P/6N: DMX channel mode
2.) Data Bar
DMX: DMX address, Background turns from BLACK to RED when DMX cable was connected.
SAFE: Safety address, Background turns from BLACK to RED when DMX cable was connected and
safety channel activated.
PRES: Pressure value. Background turns from BLACK to RED when pressure reached / exceed 90% of
“set pressure”value.
3.) Message Bar
USER MODE / error or alert information display, Background color turns to RED when under “USER
MODE”.
4.) Touch Button function display:
First Button: MENU / BACK
Second Button: UP / LEFT
Third Button: DOWN / RIGHT
Fourth Button: MONI / EDIT / SAVE
3. ARM indicator light

Operators can enable/disable the arm indicator light by set the “ARM STATE” in ADVANCED menu. If
“ARM STATE” is ON, there will be three status:
OFF: DMX signal input
BLINK: DMX armed or Ext Ignite in advanced menu is ON
ON: no DMX signal and Ext Ignite in advanced menu is OFF
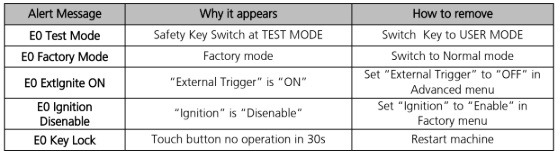
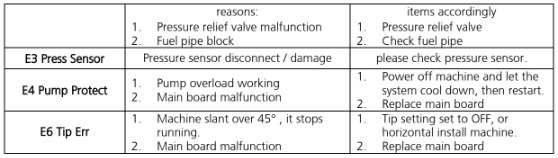
4. Alert Message
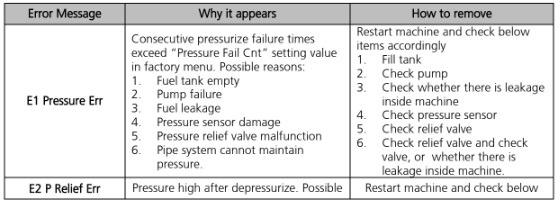
5. Error Message
6. Monitoring Interface
Press “MONI” enter below interface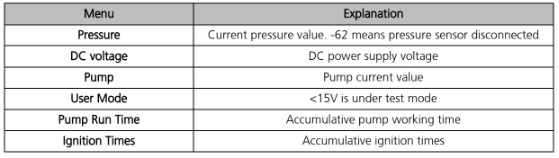
7. Menu Interface
Press “MENU” enter below interface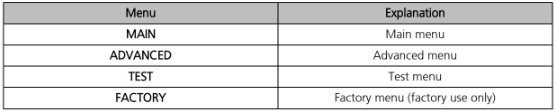
8. Main menu
Select “MAIN” in menu interface, press “EDIT” enter main menu. Use UP / DOWN / SAVE to change the
parameters.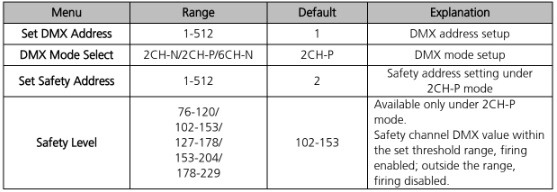
9. Advanced menu
Select “ADVANCED” in menu interface, press “EDIT” enter advanced menu. Use UP / DOWN / SAVE to
change the parameters.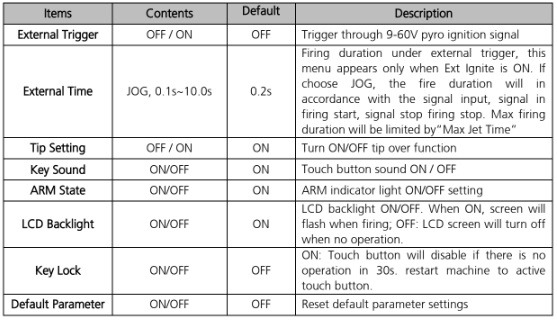
10. Test menu
Please disconnect DMX connection before enter test menu.
Select “TEST” in menu interface, press “EDIT” enter test menu. Use UP / DOWN / SAVE to change the
parameters.
“External Trigger” will disable after enter TEST menu, Pressure relief valve will open, below related items
will shows “Running” when testing, shows “Finish” after test finished.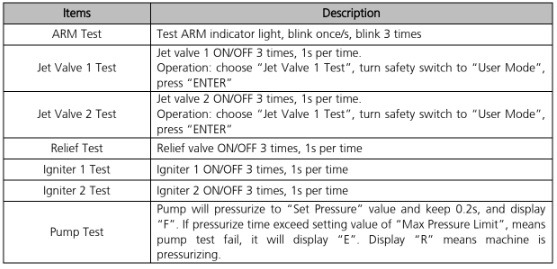
Δ DMX CONTROL
cFlamer with 3 different channel mode: 2CH-P, 2CH-N and 6CH-N.
2CH-P(2P):
In this channel mode cFlamer occupies 1 functional channel CH-F and 1 separate safety channel CH-S (this
channel is independent from operational channel, can be shared with other machine).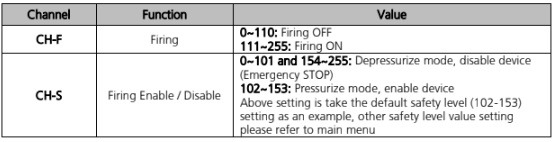
2CH-N(2N):
In this channel mode cFlamer occupies 2 functional channels.
6CH-N(6N):
In this channel mode cFlamer occupies 6 functional channel. This channel mode is designed to control the
cFlamer together with CIRCLE FLAMER on our Host Controller.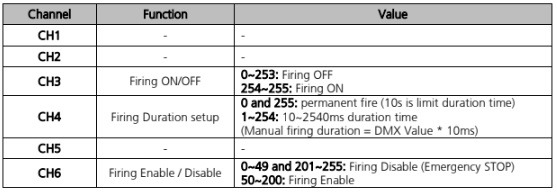
Δ Operation
1. Safety distance explanation
Safety distance for cFlamer divided into two parts safety radius around machine (a) and safety distance at
firing direction (b). No person and flammable materials are allowed to stay inside the safety isolation zone
when flamer was armed.
The safety radius around machine with a radius of 3m.
For safety distance at firing direction equals to maximum firing height * 1.5.
The cFlamer safety isolation zone (show as below) is a cylindrical three-dimensional space with Safety
radius around machine (a) and Height of b. Unauthorized persons and objects are strictly prohibited from
entering.
For angled installation, the safety distance both around machine and firing direction should shift
accordingly.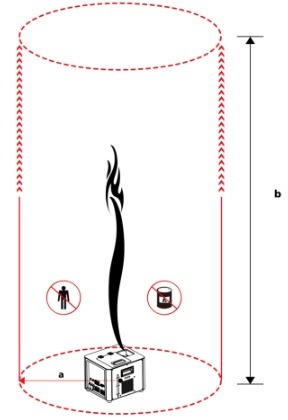
Safety distance in windy environment
The safety isolation zone radius (a) increase with wind direction and wind speed (v, m/s). The safety
distance in windy conditions can be calculated as below: a = 3 + v;
For example when the wind speed is 3m/s, then the safety isolation zone radius should be 6m, When the
wind speed ≥ 8m/s (wind force ≥ 5), please use it with caution. When wind speed ≥ 17m/s wind force
≥ 8 , please stop use cFlamer.
2. Install cFlamer
a) Horizontal installation is preferred for cFlamer. If need to install cFlamer in angles, to avoid fake
error message please turn the TIP Setting OFF first. cFlamer with maximum tilt angle of 45° or -45°,
and it can be angled to two directions as show in below picture. Besides please be aware the fuel
level in fuel tank to avoid fuel leakage when tilt installation.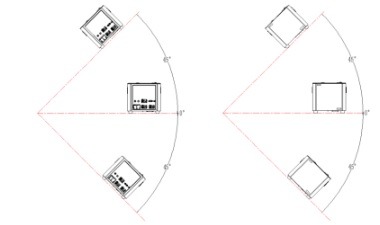
b) For truss installations always connect with safety rope to ensure extra safety. If there is any other
national or regional guidelines please follow it accordingly.
c) Double confirm the machine was firmly installed.
WARNING:
Ensure the installation position of cFlamer meet above safe distance requirements. cFlamer supplied
with a nozzle cH which generate up to 10m flame.
3. Color fluid preparation
a) Ensure all containers, fuel tanks etc are clean and free of impurities. Highly recommanded to use
container/fuel tank with a fixed color, not mix with different colors. If you have no extra tanks,
please wash container / fuel tank with clean water thoroughly before use another color fluid.
b) When wash the fuel tank, add half of the fuel tank capacity of clean water, shake it repeatedly for
30 seconds, pour out the water, and repeat the cleaning process twice.
c) Perform the mixing operation according to the instructions on the color additive label. For blue,
pay special attention to the proportion and addition order. Add 2 bottles (125ml*2) of BLUE A
liquid to 5L diluent liquid and shake well, and then add 15ml BLUE B liquid. For other colors, just
add 125ml color additive to 5L diluent liquid and shake well.
d) There will be solid precipitate at the bottom of color additive bottle when environment
temperature is low, please shake repeatedly to dissolve the solid precipitate before add it to the
methanol.
e) Please shake and mix the color fluid well before use.
f) The prepared color fluid needs to be stored with a cap and implemented in accordance with the
requirements of the diluent liquid MSDS or local regulations.
NOTICE:
Ensure that the purity of diluent liquid.
NOTICE:
The optimal viewing condition for the color flame effect is in a dark environment.
WARNING:
The preparation operation should be carried out in a well-ventilated place, away from fire, sparks
and heat sources. Dry powder or carbon dioxide fire extinguishers should be prepared for use in the
operation site.
WARNING:
cFlamer series product compatible with color fluid only prepared with SHOWVEN original color
additives, other colored fuels are forbidden to use on the product, It will sure damage the machine.
4. Fill the cFlamer
a) Switch safety lock to TEST MODE.
b) Fill the fuel tank with qualified color fluid we prepared.
c) To avoid color mix, it is highly recommended to fix the color used on each unit of cFlamer. In case
need to change to another color fluid please execute pipeline clean process (refer to 11. Pump
and pipeline cleaning of this manual).
WARNING:
The warranty is void if any other type of color liquid or additive is used.
NOTICE:
SHOWVEN excludes liability for the losses, damages and accidents caused by not using qualified fuels
in accordance with this requirement.
5. E-Stopper / E-stop terminator Connection
E-stop interface is a power cut-off interface, the machine can be powered on normally only when E-
STOP in is connected. For safer use of cFlamer we suggest to connect it with E-stopper. For operators
who don’t want to use E-stopper can plug a E-stop terminator in E-STOP IN to enable the device.
E-Stopper (optional) connect with single unit of cFlamer.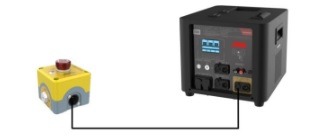
E-Stopper (optional) connect with multi units of cFlamer in daisy chain.
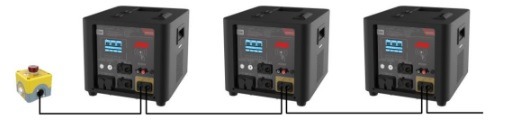
NOTICE: A unit of E-Stopper can control maximum 24 units of device.
Use E-stop terminator (standard configuration): if without E-Stopper. Plug the E-stop terminator to the
E-STOP IN port to enable the cFlamer.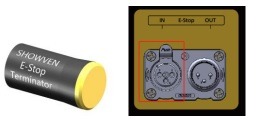
6. Connecting cFlamer
Make sure the DMX or pyro controller is disarmed or powered off during cable connection.
If control by DMX controller, follow below steps:
a) Connect a DMX cable to the DMX IN socket of first unit of cFlamer, another head of this DMX
cable connect to DMX console (such as FXcommander). Make sure the DMX console is powered
off.
b) Connect a DMX cable to the DMX OUT socket of previous cFlamer, and the other end to the DMX
IN of next machine. Connect all devices in series in this way.
c) Suggest to plug in a DMX terminator into the DMX OUT in last unit of machine to improve signal
reliability. For distance >200m please use SHOWVEN DMX splitter 8 to amplify the signal.
d) Connect a power cable to the POWER IN socket of cFlamer. Make sure power supply in consistent
with the rated voltage of the equipment, and the socket must well grounded.
e) Power on all cFlamer. Check the safety lock, double confirm it stays at “TEST MODE”.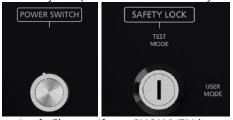
f) Assign DMX address for each unit of cFlamer. If use SHOWVEN host controller or FXcommander to
control the machine please allocate a unique DMX address for each unit of machine.
If control by 9-60V pyro signal, follow below steps:
a) Connect a power cable to the POWER IN socket of cFlamer. Connect the other end of power cable
to the power source. Make sure power supply in consistent with the rated voltage of the
equipment, and the socket must well grounded.
b) Connect the power control cables to the 9-60V pyro signal connector on cFlamer.
c) Connect the other end of power control cables to the pyro controller (9-60V external trigger
source), such as SHOWVEN PyroSlave series module. Before connect please make sure there is no
pyro signal input.
d) Power on all cFlamer
e) Set the Ext Ignite to ON status in advanced interface, set the firing duration.
NOTICE:
The ventilation fan will on after cFlamer connect with power cable, no matter machine was power
on or not.
7. Power ON the DMX console / Pyro controller and programming
Power on DMX console and program the cFlamer effect on DMX console or Pyro controller.
8. Test the ignition function of cFlamer
Test the ignition function of cFlamer, we can check whether the igniters of each unit of cFlamer is
working fine. Due to the safety switch is stay at TEST MODE there will be only ignition while jet
solenoid valve is not open, so no flames generated.
9. Firing
a) Double confirm the prescribed safety isolation zone is clear, no person, animal or other property
within this region.
b) Switch the safety lock of cFlamer to USER MODE.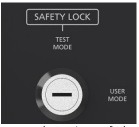
c) Firing, the operator should always have a clear view of the device, so that he/she can stop the
show immediately when there is danger.
NOTICE:
Due to the pump and pipeline cleaning procedure after each show, there will be some water
remains in the pipeline, so the first several shots may spray water and fail ignition. Even though
please make sure no person, animals or other flammable articles stays in the safety isolation area
when firing.
10. Depressurize and Power OFF
a) Depressurize the flame unit after show or not use flamer for a period of time
b) Power OFF DMX console
c) Press E-Stopper to power OFF all machine (if connect with E-stopper)
d) Switch safety lock of cFlamer to TEST MODE
e) Power OFF each unit of machine
f) Unplug power cable, DMX cable, E-Stopper connection cable etc.
11. Pump and pipeline cleaning
a) Collect all cFlamer, take the color fluid tank out and replace with water tank with no less than 2L
purified water inside.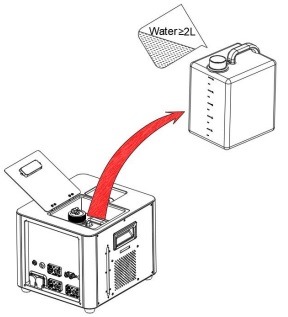
b) Connect with power and DMX cables, power on machine.
c) Pressurize and depressurize cFlamer 3 times.
d) Pressurize machine and firing 3 times with firing duration of 1s.
e) Pressurize and depressurize cFlamer 3 times again.
f) Emtpy the remaining water in fuel tank
DANGER:
Make sure there is no fuel inside fuel tank when make cleaning procedure, otherwise it may cause
fire.
WARNING:
Pump and pipeline cleaning procedure is a mandatory operation after the machine is used, Not to
do so will shorten the shelf life of cFlamer series product due to the corrosive of color fluid.
WARNING:
Before clean test, make sure there are sufficient purified water in the fuel tank. During the
cleaning process, the flamethrower will spray a large amount of water, please ensure there is no
non-waterproof objects or equipment around.
NOTICE:
Pump and pipeline cleaning procedure is also a necessory operation when use a different color on
cFlamer series product, Not to do so will cause abnormal flame color due to the remaining fluid
from previous firing.
12. Clean and package machine
a) Clean the water on machine, wait until it dry
b) Package the machine after it is cool down
Δ Nozzle Replacement and Igniter Position Adjustment
1. Nozzle Types and Flame Height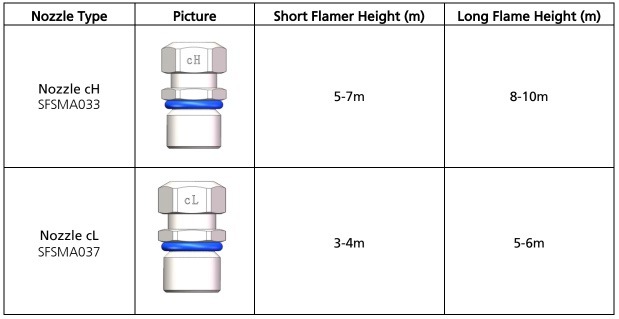
2. Nozzle Replacement
Use 14mm outer hexagon socket wrench (SFMET944) to disassemble the nozzle, clean the nozzle and
nozzle socket with air gun (air compressor), change a new nozzle and install it.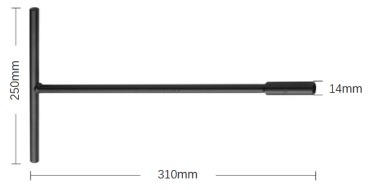
3. Nozzle structure and assemble
Please assemble the stainless steel gasket, O-ring(blue) and nozzle as shown below. The O-ring should
be inside the stainless steel gasket, otherwise it may cause fuel leakage from the nozzle.
Please use the nozzle replacement tool hexagon socket wrench to tighten the nozzle.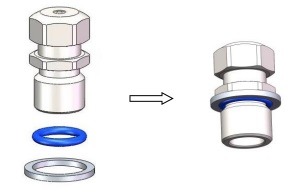
4. Igniter Position Adjustment
Whenever changed the nozzle or ignition is not good, please check igniter pole position according to
below parameters. The right position for each pair of pole should have a gap from tip to tip of 2.5-
3mm (b) and a gap between two igniter of 18mm (a). Check the ignition success rate after adjustment
by firing.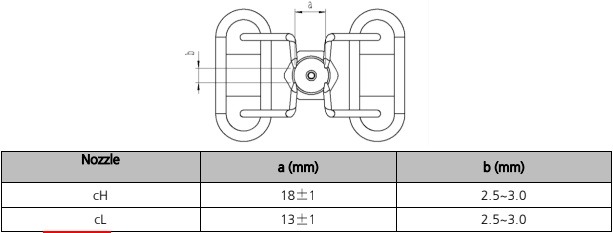
WARNING: Do unplug the power cable and power off the machine when service flamer.
Δ Maintenance
1. Execute pump and pipeline cleaning procedure every time after use the machine to clean the pump
and pipeline of machine.
2. To maintain the machine in good performance and running status, it is recommended to running the
device at least once per month.
3. Check the ignition probes both before and after each show, if there is any foreign objects on it please
clean it up.
4. Maintenance of the nozzle: Nozzle needs to be cleaned from time to time, and it is recommended that
once every six months (depending on the environment and frequency of use). In the process of using
the equipment, if the flame shape is seriously deformed or the fuel injection line is significantly
deformed or coarsened, the nozzle should be removed immediately for cleaning. If after clean, there
are still problems please replace new nozzle.
5. Maintenance of the O-ring: If it is found that the O-ring of the nozzle is damaged or ageing when
cleaning the nozzle, the Fluorine rubber O-ring should be replaced in time.
Δ Optional Parts for cFlamer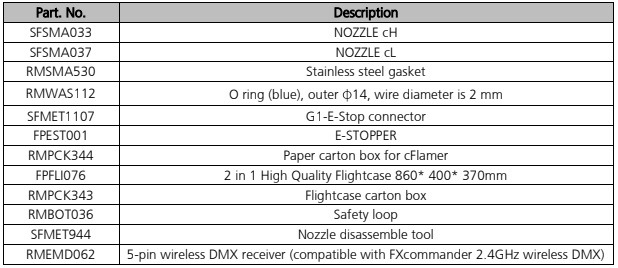
Δ Warranty Instructions
\ Sincere thanks for your choosing our products, you will receive quality service from us
\ The product warranty period is one year. If there are any quality problems within 7 days after shipping
out from our factory, we can exchange a brand new same model machine for you
\ We will offer free of charge maintenance service for machines which with hardware malfunction
(except for the instrument damage caused by human factors) in warranty period. Please don't repair
machine without factory permission
Below situations NOT included in warranty service:
\ Damage caused by use unqualified fuels;
\ Damage caused by improper transportation, usage, management, and maintenance, or damage caused
by human factors;
\ Disassemble, modify or repair products without permission;
\ Damage caused by external reasons (lightning strike, power supply etc.)
\ Damage caused by improper installation or use;
For product damage not included in warranty range, we can provide paid service.
Invoice is necessary when applying for maintenance service from SHOWVEN