In stock


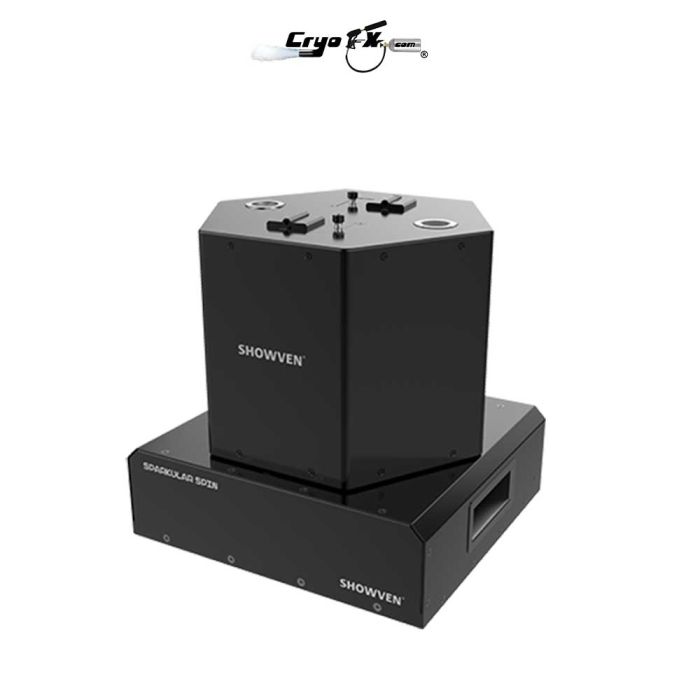
Description / Showven Sparkular Spin Cold Spark Machine
Showven Sparkular Spin is a spinning cold pyrotechnics display sparkler fountain.
The Showven Sparkular Spin rotating cold sparks system produces a fantastic, non-hazardous gerb effect that looks exactly like traditional fireworks or jet burst pyrotechnics.
Features and advantages for Sparkular Spin - Spinning Spark Machine
- Bidirectional rotatable
- Adjustable rotation speed
- Two 20° angled nozzles generate a waltz-like lissome and romantic sparks effects
- Stainless steel panel, stable and durable
- DMX controllable, 2/4 channels switchable
- Built-in wireless control, easy programming
- *For safety, please do NOT touch sparks with hands or other flammable objects.
Specifications for Sparkular Spin:
- Model: BT81/BT82
- Dimension: 330 x 305 x 349mm
- Weight: 20kg
- Input: AC220V 50/60Hz / AC110V 50/60Hz
- Work power: 1000W
- Effect height: HC8200 LARGE(2~5m)Height adjustable
- HC8200 MEDIUM(2~4m)Height adjustable
- Effect direction:Two 20°angled nozzles
- Hopper capacity:200g*2
- Consumable consumption rate:20g/min*2
- Control: DMX controllable, 2/4 channels switchable
- Interface: Neutrik 3-pin & 5-pin DMX IN/OUT
______________________________________________________________________________________
Showven Technologies Co., Ltd.
Thanks for choosing SPARKULAR® SPIN, we wish it will sparks up your show.
Please read the following manual carefully before operating this product.
Δ Safety Instructions
\ Unauthorized repair are prohibited, it may cause serious incident.
\ Keep SPARKULAR® SPIN dry and do NOT use in rain or snow.
\ Make sure lid of feeding hopper are well covered when use SPARKULAR® SPIN.
\ Accidentally burning of consumable can only use sands to extinguish.
\ Consumable should keep away from moisture and stored in a dry sealed environment.
\ Check whether there is consumable aggregate in the output nozzle both before and after
each show, if any, please clean it up, or it will affect the firing effect or even damage
machine.
\ Please be noted that there may sparks or remains fall to the ground. Make sure there is no
flammable objects such as carpet on the ground with a radius of 3m close to the machine.
\ Suggest to use HC8200 MEDIUM or SMALL for indoor events.
\ Maximum cascade of SPARKULAR® SPIN is 2 units with one standard power cable. For 110V
version, we suggest each machine connect to power supply directly. Otherwise it may
damage the machine and even cause fire.
\ For better heat dissipation, block the air intake and air outlet is prohibited.
\ Cover the output nozzle of SPARKULAR® SPIN is forbidden, inspect the machine before each
show, making sure no objects or material will block the output nozzle.
\ Never touch the nozzle of SPARKULAR® SPIN, danger of getting burnt
\ Never touch the sparks which shooting out from the nozzle
\ Ensure that children, animals and unauthorized persons don’t have access to the
SPARKULAR® SPIN.
Safety Distance
\ Keep audience and flammable material at a minimum distance of 3m from SPARKULAR®
SPIN.
\ Make sure sparks shoot out from SPARKULAR® SPIN can NOT touch any objects. And keep a
clearance with minimum 1m from the setting maximum effect height.
\ In windy environment, increase the safety distance according to the wind direction and speed.
\ Sparks and consumables from the machine can lead to serious eye injury. Always wear safety
goggles when enter the safety zone.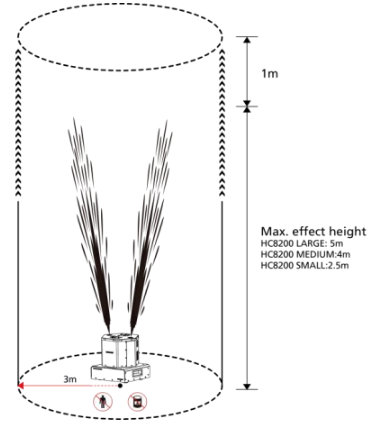
Δ Description
SPARKULAR® SPIN is another global pioneering SPARKULAR® machine originally from
SHOWVEN®. With two 20° angled nozzles and bidirectional rotatable structure, it creates the
waltz-like lissome and romantic sparks. With adjustable rotation direction, rotational speed
and effect height, SPARKULAR® SPIN bring a new visual effect to your events.
Δ Technical Specifications
\ MODEL: BT81/BT82
\ DIMENSION: 330×305×349mm
\ WEIGHT: 20kg
\ CASING MATERIAL: 304 stainless steel
\ VOLTAGE: 220V(BT81)/110V(BT82), 50/60Hz
\ WORK POWER: 1000W
\ WORK TEMP.: -20°C~50°C
\ EFFECT HEIGHT: HC8200 MEDIUM: 2~4m, HC8200 LARGE: 2~5m
\ HEIGHT ADJUSTABLE: YES
\ EFFECT DIRECTION: two 20° angled nozzles
\ HOPPER CAPACITY: 200g*2
\ HC8200 CONSUMPTION RATE: 20g/min*2
\ INTERFACE: Neutrik® powerCON TRUE1 IN/OUT
Neutrik® 3-pin&5-pin XLR IN/OUT
\ CONTROL: DMX 2/4 channels switchable, wireless remote
Δ Structure of SPRKULAR® SPIN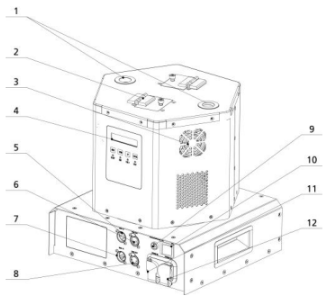
1. Output Nozzle
2. Feeding Hopper Lid
3. Cooling Fan
4. LCD Screen
5. 3-PIN DMX IN
6. 3-PIN DMX OUT
7. 5-PIN DMX IN
8. 5-PIN DMX OUT
9. Fuse
10. Power Switch
11. Power IN
12. Power OUT
Diagram of Bottom Panel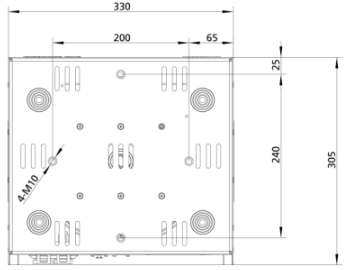
Δ Operation Panel
1. LED display area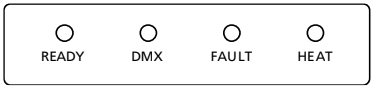
READY: Turns from flashing into long on, indicates that the machine is ready to work.
DMX: Flashing shows that DMX signal is connected; light OFF means there is no DMX signal
FAULT: Light ON when error occurs
HEAT: Light ON when system is heating up
2. Control button area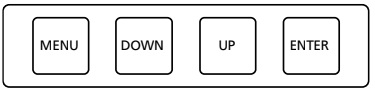
MENU: Press to switch through menu, press and hold for 3s enter advanced menu
DOWN: Parameter down
UP: Parameter up
ENTER: Confirm and save parameters
3. RFID area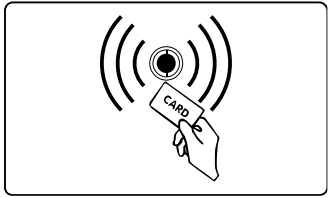
Composite Ti with RFID card, swiping cards used to identify parameters and types of granules.
The RFID card is disposable, one card can only use one time.
Δ Interface
1. Main Interface:
First Line: Shows inner core temp. of Nozzle 1, inner core temp. of Nozzle 2,
RPM: Spinning speed
Second Line: DMX address, error info. if available, CH2/CH4 means 2 or 4 channel mode, remain
working time
2. Error information: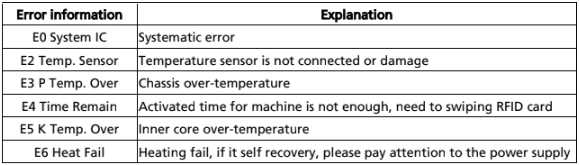
3. Setting Menu:
Press “MENU” switch through setup menu.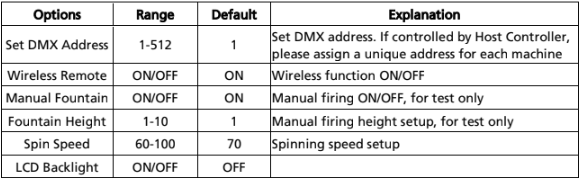
4. Advanced Menu:
Press “MENU” 3 seconds to enter the advanced setup interface, press MENU key to enter
different options, wait 3 seconds to return to the main interface.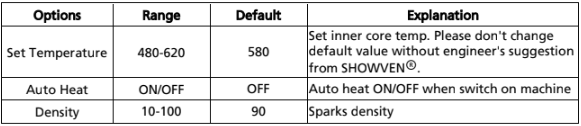
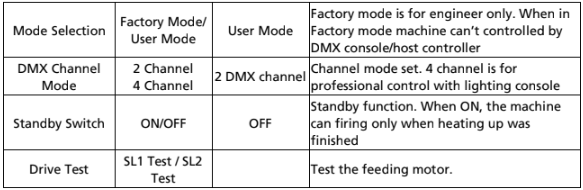
5. DMX control
There are two different DMX mode for SPARKULAR® SPIN, 2 channels mode and 4 channels
mode.
2 channels mode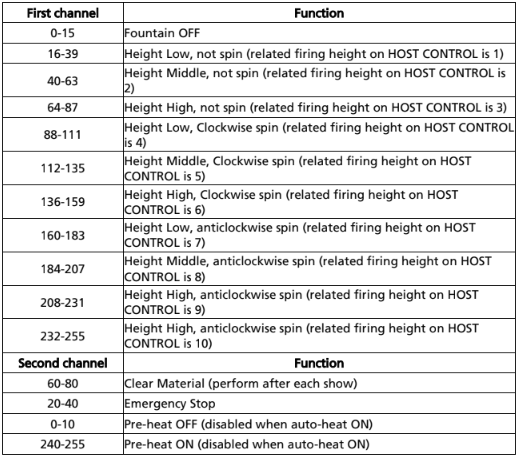
4 channels mode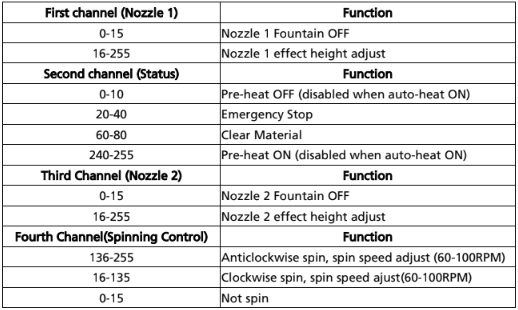
Δ Operation Guide
1. Install SPARKULAR®SPIN
a) SPARKULAR® SPIN can only installed horizontally.
a) Make sure the machine is securely installed to avoid tipping.
b) Check carefully the output nozzle of each machine, make sure the output nozzle is in good
shape and there is no powder aggregate.
2. Fill SPARKULAR®SPIN
a) Open powder bags and fill the feeding hopper. Hopper capacity of SPARKULAR® SPIN is
2*100g.
b) Choose correct consumable according to the application scenario.
c) Please be noted that there may sparks or remains fall to the ground. Make sure no
flammable material on ground in the safety zone.
d) Maximum effect height: HC8200 LARGE is 5m, HC8200 MEDIUM is 4m.
e) Make sure the lid of hopper is locked tight after filling.
3. Connect Power / DMX cable
a) Connect a power cable to the POWER IN socket of SPARKULAR® SPIN. Connect the other
end of power cable to the power source. Make sure power supply in consistent with the
rated voltage of the equipment, and the socket must well grounded.
b) If connect machine in sequence, please connect a power link cable to the POWER OUT of
previous machine, connect the other end of the power link cable to POWER IN of the next
machine.
c) Maximum cascade of SPARKULAR® SPIN is 2 units with one standard power cable. For 110V
version SPARKULAR® SPIN, we suggest each machine connect to power supply directly. Do
not connect exceed units to a single electrical circuit.
d) Power ON all SPARKULAR® SPIN.
e) Assign DMX address for each unit of SPARKULAR® SPIN. If use SHOWVEN host controller or
FXcommander to control the machine please allocate a unique DMX address for each unit
of machine.
If use remote controller to control SPARKULAR® SPIN wirelessly, please set machine to
wireless ON status and match machine with remote controller. For DMX cable control please
execute below operations (f to h).
f) Connect a DMX cable to the DMX IN socket of first unit of SPARKULAR® SPIN, connect the
male connector end of DMX cable to your DMX controller (FXcommander, HOST
CONTROLLER, light console etc).
g) Connect a DMX cable to the DMX OUT of previous machine, and the other end of to the
DMX IN of next machine. Connect all devices in series in this way.
h) Suggest to plug in a DMX terminator into the DMX OUT in last unit of machine to improve
signal reliability. Signal amplifier is required for long distance (>200m) DMX signal
transmission.
4. Activate SPARKULAR® SPIN by swipe RFID card
a) Swipe an RFID card. Read the card as show below. SPARKULAR® SPIN LCD screen will flash
once if charged successfully.
b) SPARKULAR® SPIN will report E4 when remaining time is less than 10 minutes.
c) Please note each RFID card come with 200g package HC8200 can increase single machine
20min working time, the maximum recharge time each time for SPARKULAR® SPIN is 30min,
when time remain reached 30min, it can’t recharge anymore RFID card.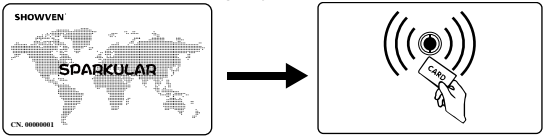
5. Programming and Firing
a) Programming SPARKULAR® SPIN, set the firing height, firing sequences etc.
b) Heating up, it takes around 5min, it varies according to the voltage and environment
temperature.
c) Make sure the prescribed safety zone is clear.
d) Suggest to clear material before firing.
e) Firing. In order to prevent overheat in the heating chamber and protect machine, the
maximum continuous firing time for SPARKULAR® SPIN is 30s.
f) The operator should always have a clear view of the device, so that he/she can stop the
show immediately when there is danger.
g) Clear material for SPARKULAR® SPIN for 5s after show, clear material will remove the
remaining particles from heating chamber.
6. Turn off and Clean up
a) Power off SPARKULAR® SPIN, allow SPARKULAR® SPIN to cool down.
b) Disconnect all POWER and DMX cables.
c) Empty the remaining HC8200 in hopper, and store the remaining HC8200 in a dry sealed
bottle for next time use. Never touch the output nozzle of SPARKULAR® SPIN when empty
the hopper. DANGER OF GET BURNT!
d) Operators can use handheld vacuum cleaner to empty the feeding hopper. Do make sure
the machine was cool down when clean it. Do NOT use high-power vacuum cleaners to
avoid hot consumables being sucked into the vacuum cleaner from the heating chamber
and cause fire.
e) Clean the surroundings to remove powder residues.
Δ Wireless Control Information
1. Wireless remote control mode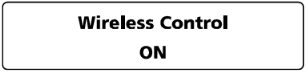
When use wireless remote control, please unplug DMX cable connection on machine, set
Wireless Control at ON status, match the remote controller with machine.
2. Remote controller
A: OFF / SET, Firing OFF, SET means match machine
with remote controller.
B: High Effect
C: Low Effect
D: Clear Material.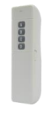
NOTE:
a) In order to prevent the same area from being serialized by other same remote controllers,
the communication code can be set manually. This remote controller has 5 kinds of
communication codes related to 5 different colors: red, green, blue, yellow, white. Press and
hold the key A for 3s, LED flashes, release the key, and then press the A key to switch the
flashing light color to adjust the communication code, and press the B key to confirm and
save. After modifying the communication code, perform the code matching operation again.
b) When the indicator light becomes weak on the remote controller, please replace the
battery.
c) When the machine is occasionally not working, may be caused by interference, please press
the start button again.
d) Wireless control is easily influenced by interference, suggests to stay as close to machine as
possible when use remote controller, and machines cannot use metal shielding
Δ Maintenance
1. Empty the feeding hopper before shipment of machine.
2. Empty the feeding hopper if long time not use, for high humidity environment we suggest
to empty feeding hopper after each show.
3. Clear material both before and after the show.
Δ Warranty Instructions
\ Sincere thanks for your choosing our products, you will receive quality service from us
\ The product warranty period is one year. If there are any quality problems within 7 days after
shipping out from our factory, we can exchange a brand new same model machine for you
\ We will offer free of charge maintenance service for machines which with hardware
malfunction (except for the instrument damage caused by human factors) in warranty period.
Please don't repair machine without factory permission
Below situations NOT included in warranty service:
\ Damage caused by use other type of consumable which is not originally from SHOWVEN®.
\ Damage caused by improper transportation, usage, management, and maintenance, or
damage caused by human factors;
\ Disassemble, modify or repair products without permission;
\ Damage caused by external reasons (lightning strike, power supply etc.)
\ Damage caused by improper installation or use;
For product damage not included in warranty range, we can provide paid service.
Invoice is necessary when applying for maintenance service from SHOWVEN®.